Artisan and Craft Shows Right Around the Corner

It’s been a beautiful fall! It was so colourful out here in the woods. Most of the leaves have fallen off of the trees now and only the Beech tree leaves are hanging on, golden brown and rustling in the wind.

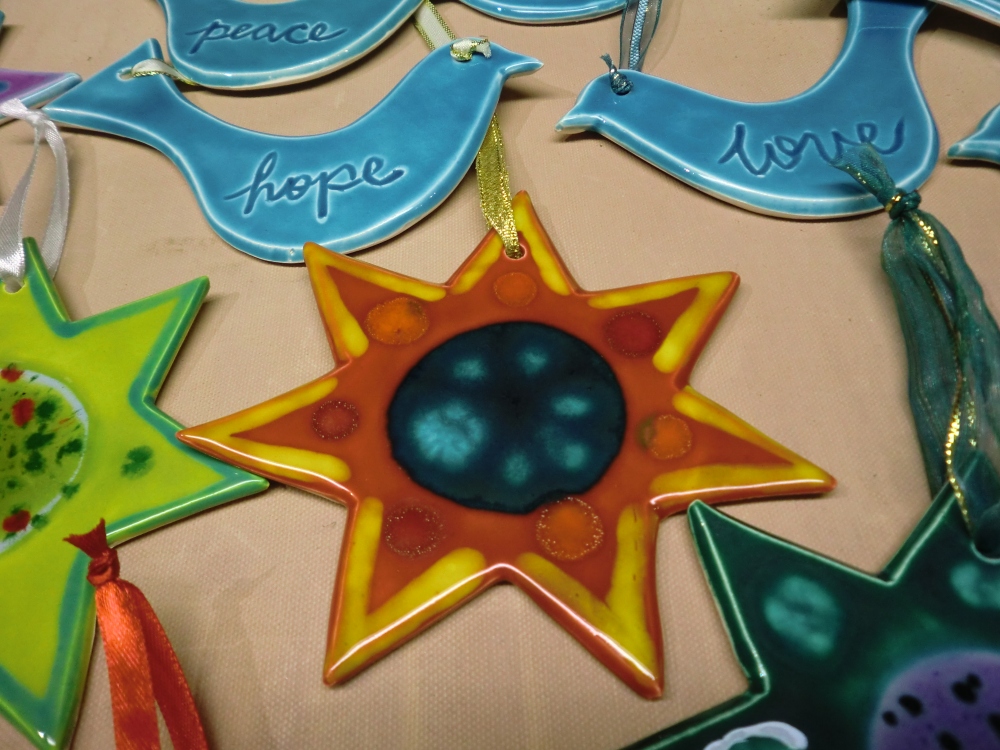
In the pottery I’m glazing 7 pointed star tree decorations. Every one of them is a unique piece, never to be repeated twice. It is impossible to replicate a piece when making things by hand and one-by-one. Each star is hand cut and after the stars are bisque fired I paint on layers and layers of glaze for an amazing and dazzling finish.

Here’s an example of some I’ve made in recent years.

Doves and 7 pointed star, "Star Brite."  White earthenware with layered glazes and bursting crystal glaze centre.

Doves and 7 pointed star, “Star Brite.” White earthenware with layered glazes and bursting crystal glaze centre.

For November and December I’ll be at 4 artisan and craft sales in the Ottawa/Gatineau region.

The first one is on Saturday, November 8 at Buckingham Elementary School, 615 rue Georges. The sale starts at 9 a.m. and goes until 4 p.m. Last year there was no craft sale in Buckingham, but this sale is sure to get you started on the right foot where gift shopping is concerned. There will be artisans there who make jewelry, wood sculptures, home decor, knitwear and of course I’ll be there with my pottery. Proceeds from the table rentals (a fee that we artisans pay to be there) go to the school for various student activities. It’s a win-win! Come out and support local art!

On Saturday, November 22 and Sunday, November 23 from 9 a.m. until 4 p.m., I will be at the Ottawa Valley Crafts and Collectibles (OVCC) Christmas event “Joy!” at The Library and Archives Building at 395 Wellington Street, Ottawa. The charity we are supporting is the Ottawa Senators Foundation. To see who is selling at this artisan event, go here:
http://www.ovccshow.com/
“The 2014 OVCC | Artisans @ Archives Christmas Art & Craft Extravaganza”

On Saturday, November 29 and Sunday, the 30th from 11 a.m. to 4 p.m. I’ll be at the Shenkman Arts Centre, 245 Centrum Boulevard in Ottawa’s east-end, for Baz’Art – The Holiday Show and Sale along with 32 other artists and artisans. http://shenkmanarts.ca/en/calendar_calendrier/november_novembre_2014/bazart/index.htm

And for my big finale I will be at MAC Fair on Saturday, December 6 from 10 a.m. – 3 p.m. MAC Fair is held at Immaculata High School, 140 Main St., Ottawa ,in the gym and there will be 100 crafters and artisans there! Tune in to http://www.macfaircrafts.com/event-details.html
for more details.

Posted in my work, shameless self-promotion | Leave a comment

Fall Open House Thanksgiving weekend 2014

On Sunday, October 12 and Monday, October 13 the pottery doors are OPEN, as in OPEN HOUSE. I’m hoping that the weather will be nice enough to have refreshments and to display things outside. So far the forecast is looking fabulous!

I’ve been baking lemon scones. They’re pretty tasty. Gotta bake more today! And I’ve been thinking of making something chocolaty too. 🙂

1487742_743188352366914_272845241_o (1)

Here’s the “official” scoop:

Come and see what’s been happening at the pottery over the summer at the Fall Open House at Mayo’s only pottery, Poterie LM Serafin Pottery.

Experience the gorgeous countryside of West Quebec in all of it’s fall splendor and enjoy new works being presented – the fruits of this summer’s hard work in the pottery studio. It’s the perfect time to start collecting or adding to your collection of pottery by Lisa-Marie.

For two days over the Thanksgiving long weekend – Sunday October 12th and Monday October 13th from 10:00 a.m. until 6:00 p.m. you can watch Lisa-Marie in action as she gives demonstrations on the potter’s wheel. You can also tour her pottery studio and see how pottery gets made; from a lump of wet clay to a finished piece. You can even try your hand at making a pot, so let your creative side come along for the ride!

There will be refreshments (coffee, tea, home baked treats) and you can enter your name into the draw to win a $50 gift certificate to spend at Poterie LM Serafin Pottery.

Mark your calendar and come on up and enjoy a weekend trip to the little pottery in the woods, Poterie LM Serafin Pottery on Sunday October 12th and Monday October 13th from 10:00 a.m. until 6:00 p.m both days.

Posted in shameless self-promotion | Leave a comment

Spring Cleaning All Year Round

I don’t often write pottery blogs, but have meant to all along. We get caught up in work these days, don’t we? Being self-employed isn’t easy. Well, part of it is. It’s really easy to be hard on myself and take 100% of the blame if things aren’t going well. It’s also easy to think of myself as being lazy for not getting around to certain jobs like marketing or writing blogs. It’s easy to get down on myself if I’m behind in the grunt work that is ever present in a studio. It’s easy to feel guilty when I stop to rest, eat, practice yoga, take a walk or tend to my garden.

A lot of things got put aside this year while I attempted to make quite a lot of custom ordered dinner plates – a total of 28 plates – in a 8 month period. I’m not quite done yet. It’s a cinch to make the plates. What is taking so long is the firing of said plates. It’s slow going when you have one 3 cubic foot kiln for bisque firing and one 7 cubic foot kiln for glaze firing.

Every time I open a new issue of Ceramics Monthly and see some potter’s expansive studio space I am truly envious. My workshop is 2/3 of a standard garage that was built in the 70’s. The front 1/3 of the garage (which was converted to studio space in 2003) is where I have my gallery. Two or three customers can shop comfortably. It’s very…quaint…and we all know that that’s just another word for teeny weeny.

I’m really “into” working with what I have. I have a small studio and small kilns and that’s just the way things are and it could change if win the lottery!

Things have clearly gotten out of hand in my wee studio. How? You may ask. Well, I have a thing for trying to improve my pottery and that entails trying out a new clay bodies and new glazes. My interest lies in working with the clay body. I’m less interested in the decoration on a pot and instead spend my time on the architecture of making a great pot. Usefulness is key for me. It has to be useful or it doesn’t really spark my interest.

Clay takes up space and so do large buckets of glaze. Even many smaller buckets of glaze take up space. Give me a bucket and I will make some glaze. A girl can never have too much colour in her life, right? Glazes provide not only colour but visual textures, depth, a sensation to the touch – some glazes are smooth and velvety and some are glossy and glass-like while others can be dry, rough, or even bumpy. With any experimentation you will have things that don’t work out, and I have many buckets of glaze mistakes that need to be discarded, so that is something that I started to clean up this summer. Yay!

Experimenting with different glazes is something that I will always enjoy, so for now I’m just cleaning up so I have room for more experimental glaze buckets in the future.

The biggest news here is that I’m dropping a few types of clay that I presently use. If you’re a collector of my pottery you might want to know which ones in case you were thinking of adding to your collection.

Right now I’m working with a red earthenware clay, porcelain, four different types of high fire stoneware a mid fire buff stoneware, and a mid fire white stoneware. That is far too many clay types for my small space. There are scrap clay buckets lining one wall of my studio. There are lots of glaze buckets too as well as bags of raw glaze materials that are taking up valuable floor space that I could use to walk on, ya know? It’s a bit of an obstacle course in the workshop.

The red earthenware has long been on my mind as a clay that I would like to phase out, so that one is first to go. I love the colour and I love working with the smooth buttery clay on the wheel, but in my opinion while earthenware clay is incredibly useful for many things it isn’t very durable. Earthenware is a soft, porous clay so it can chip easily if you don’t take care.

In its defense earthenware clay is good for many things. It keeps things cool and moist if the clay pot is made wet, as in the case of a wine cooler. You can fill a wine cooler with cold water, let it sit for a few minutes, pour out the water and insert your bottle of vino and your wine will be cool til the last drop. If you’re in a hurry, grab a handful of ice from the freezer and toss it in the wine cooler and you are good to go! The ice will melt and the cold water will get sucked up by the earthenware clay keeping your wine cool.

Earthenware is the only clay I use for the “fixer upper” wine cups I make. As you can see in the photo below, the cups are unglazed except for the edge where your lip meets it. That part is glazed so it feels nice on your lips, but if the interior were glazed that would defeat the purpose of the cup. You see, the unglazed clay is very useful at making crappy wine taste pretty good. How? When the wine comes in contact with the porous clay body it takes the edge off. The acid from the wine is absorbed by the porous clay.

carved wine cups2

If you have one of my wine cups you’ve probably done a taste test at my suggestion. Try the wine in glass and then in the earthenware cup. There is definitely a difference, and a good one at that. In addition to the wine cups I have also made wine jugs for decanting wine. The same principle applies.

Earthenware can keep things dry which is why I use it to make garlic jars. I’ve made a lot of garlic jars and glazed them and then used them as intended. I usually ended up with rotted or moldy garlic. This never happens to my garlic now because I keep it in my earthenware jar.

Garlic jars cut2

The wine cups, coolers and jars only account for a tiny portion of my sales, so once the last wad of red earthenware is gone, that’s it. I used my up my last bag of red earthenware clay yesterday, but I recycle my scrap clay (the stuff that goes into the splash pan around the wheel as well as trimmings) which will yield another 20-30 lbs of that clay. It will take about a year to phase out the red earthenware, so get it while you can.

Next time: More clay types that I’m phasing out PLUS how to recondition dried up blocks of clay.

Posted in business, my work | Leave a comment

And the Winner IS…

As a one-woman show sometimes I drop the ball. Hopefully those I may have kept waiting will be understanding and forgiving of me.

Lately life has been hectic. On the last day of our annual summer sale (June 21-22) during our BBQ, our deck caved in on one corner (thankfully no one was hurt!) and the very next day we received our niece and her best friend, who’d both turned 14 years old in mid- June, for a week long visit.

While my husband was hard at work restoring the deck to its usual height and making it more stable (wood rot was the culprit) I entertained and cared for the girls. I had no earthly idea how much having two teenagers in my home would tire me out…and those girls were relaxing!! We went to the city on a rainy day to the National Art Gallery and once went to town to shop. I also took them into the pottery studio on two of the days they spent with us to do some hand building and they learned how to throw a pot on the wheel.

The girls loved kayaking on the lake best, trying to stand up and balance on the little boats. They liked my cooking second best. 😀 They really liked making pottery too and we had lots of great moments of complete ridiculousness! Yes, I too can run around my kitchen flailing my best T-Rex arms shouting, “Make haste! Make haste!” (In reference to a somewhat entertaining movie called “Austenland.”)

After the week with the girls we were off to Winnipeg for 5 days for my cousin’s wedding and to visit our family and friends. I’ve had little chance to work with all that’s been going on, but that’s what summer vacation is all about right? Taking time off from work.

All of this to tell you about what kept me so busy that I let my duties slip. Well, I had a draw for a $50 gift certificate on June 23rd and have yet to announce the winner! Oh dear me! How awful to keep you all in suspense. Krys from Gatineau wins!! Congratulations Krys!

By the way, if you are out in Mayo this weekend the municipality of Mayo is celebrating the 150th Anniversary. Festivities begin at 2 p.m. at the municipal park on Hwy 315 at Murphy Road. There is a pig roast at 5 p.m. and tickets for the dinner are around $12 I believe. There will be some local artists (like me!) at the event selling our art from 2 p.m. until our customers stop buying stuff, there will be 3 bands playing that night also. Should be fun! Come out and seeeeee meeeeee!!

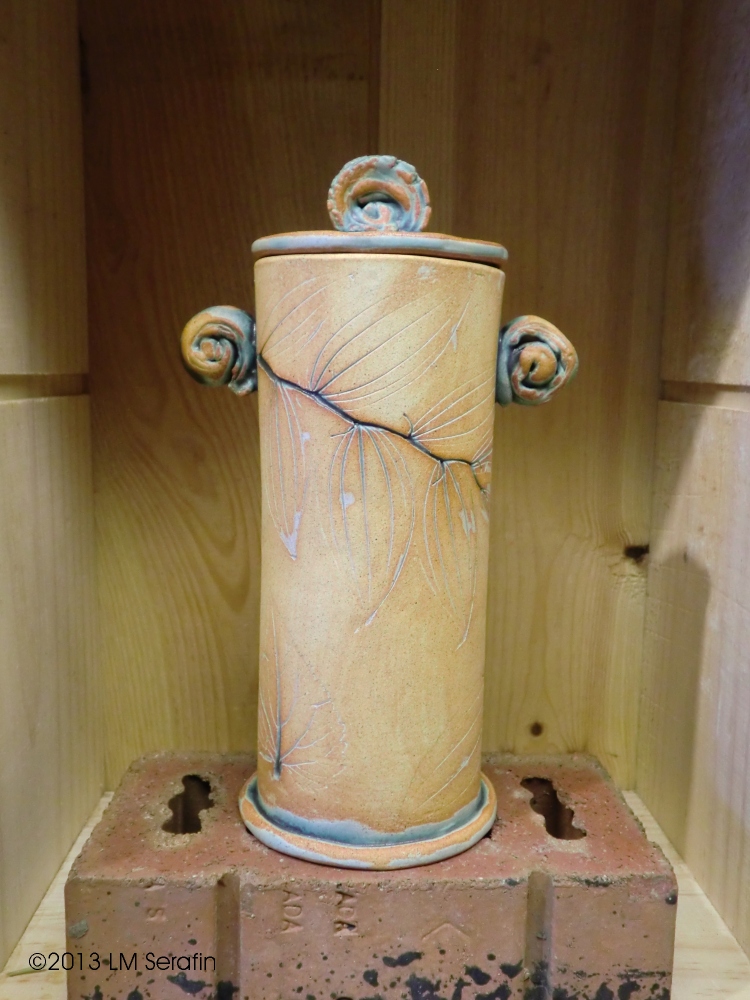
It’s back to the workshop for me now. I have dinnerware orders to fill and coffee mugs to make. Maybe some teapots too. And I just went on a walk plucking leaves to roll into soft clay and build into jars and plates.

Posted in Uncategorized | 1 Comment

Pottery in The City

This spring I will be at several art markets and craft shows starting this weekend.

I’m pleased to announce that I will be in Ottawa at the “Make It! Handmade Craft Show” on Saturday, April 5 with a great selection of my functional handmade pottery. The show is being held from 10 a.m. until 4 p.m. at:
The Cyrville Community Centre
4355 Halmont Dr.
Ottawa, ON
For more information and a complete list of artisans go here:

 http://www.actonesceneone.ca/events.html

leaf jar

A little later in April I will be at The Library and Archives in a show called “Vibrant!” You can find more information about this two day show on April 26 & 27 here:

 http://ovccshow.com/

brown and blue mug

On Saturday, May 10 I will be at MAC Fair. You’re invited! Check it out here:

https://www.facebook.com/events/313767902113174/?ref_dashboard_filter=upcoming

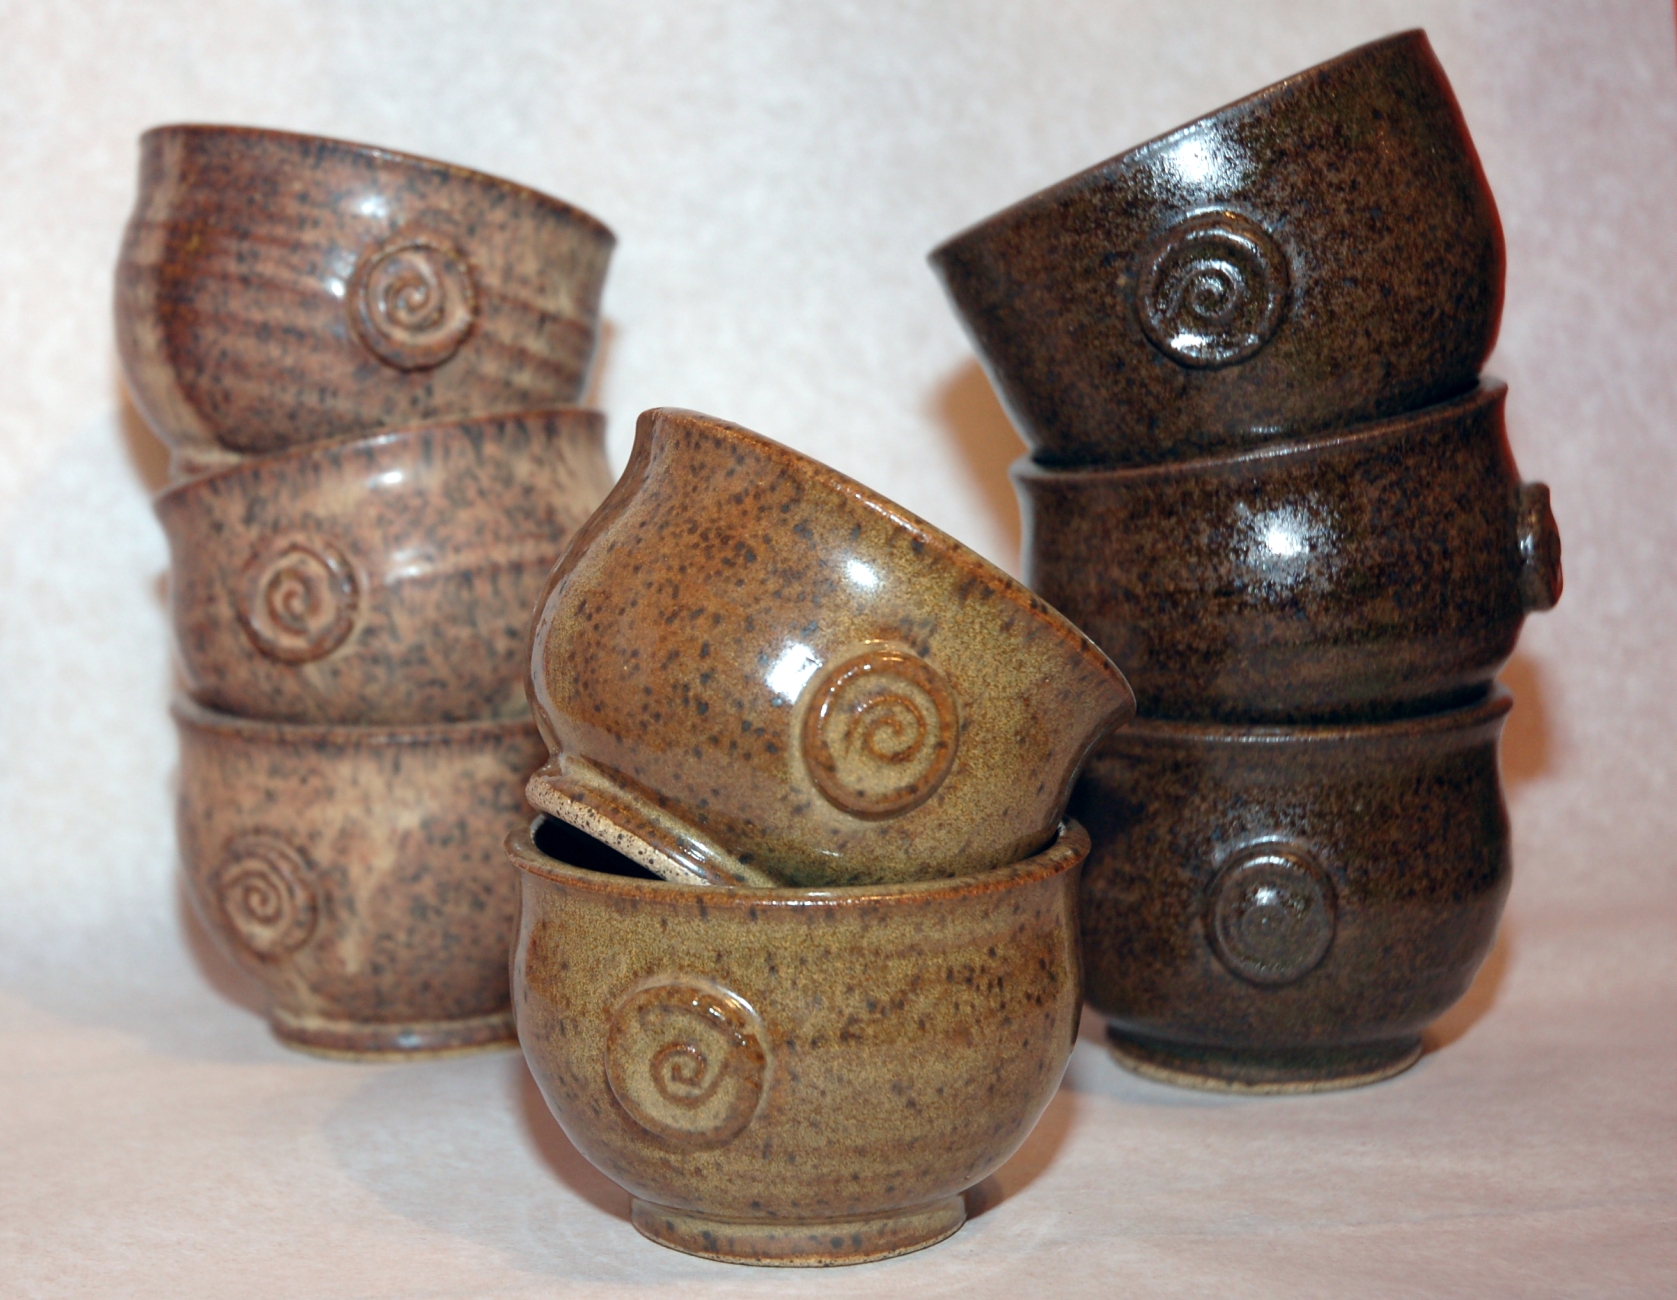
cupstacks

Now I have to go pack some pottery. See you in the city…but if you fancy a bit of country, come and see me at my home gallery.

LM Serafin new sign 2012

Posted in business, fun stuff, my work, shameless self-promotion | Leave a comment

Petroglyphs, Ancient Language / Sacred Art

It’s Throwback Thursday!

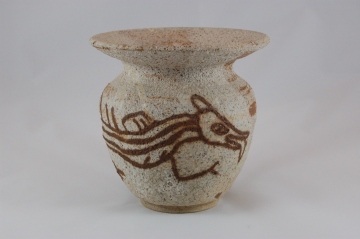
Here’s a favorite piece from my past. I made this one while apprenticing at The Blue Door Clay Studio in 2000. I was completely influenced to copy the image from the book I’d been reading – a book called Petroglyphs, Ancient Language / Sacred Art, by Sabra Moore.

Moore is an artist who decided to copy the petroglyphs and pictographs from the cave walls and rocks and make a book out it. These ancient works of art exist all over North America. She made this book as a way to preserve the art seeing as time, erosion and vandalism are threatening these ancient works.

Moore says: “The creation of this monumental art were from the 500 Indian Nations inhabiting this continent for the past 30,000 years. Their descendants are here today.”

As I myself was researching the book to make this post I noticed that all of the cave drawings that I copied onto pottery were from the back of the book in a section called Northwest Coast/Arctic and Subarctic. I was very much attracted to the kind of art that has likely subliminally influenced me living here in Canada.

Leafing through the book I see images that I copied, or thought about copying, and I count six images in total, so there are possibly four or five pieces in this style somewhere out there. I sold them to pottery lovers in Winnipeg. This one, pictured below, I decided to keep. I don’t know if I can ever make one like this again. It requires a dry shino glaze in a gas kiln and I have been firing electric since coming east in 2002.

I recall making a large oval platter that was sold in a gallery in Osborne Village, and a few other pieces though I can’t recall what they were. Platters? Tall vessels? Perhaps. I only remember drawing on the leather hard clay with a dull pencil. And I recall not being able to fit all of the figures from the drawings in the book onto the pieces I was making in the studio. Drawing is not my strong suit.

lizard vase

That was the case with this piece. Only one serpent fit on the vessel. It’s from page 145 of the book, and the illustration shows two serpents.

“The Kwakiutl Sisiutl is a double faced serpent with a snout like the sea snakes at Nanaimo Petroglyph Park. Sisutl can transform himself from sky into lightning, from fish into canoe. Like Quetzalcoatl, he can be both bird and reptile. A sailor on the Columbia witnessed a monstrous reptile emerging from the water near Clayoquot in 1791. ‘The Indians knew all about it and described it as a long creature with a huge mouth and teeth; in every other respect like a serpent. They called it Haietlik and said it was very scarce.'”

And so like the serpent in Clayoquot, these cave drawing pieces of mine are just as scarce.

Posted in my work | 2 Comments

New Year and New Frontiers

The past two years have been incredibly busy in the pottery and for that I’m really grateful. I had a record breaking year in 2013 and that came with a lot of hard work, but work that I love…mostly. The things I don’t relish are paperwork and cleaning, but nevertheless it gets done with much groaning and procrastination.

For the past two years I was busy with many custom orders and a very large dinnerware set with which I encountered some glaze issues. Luckily it was resolved to everyone’s satisfaction, but it did take some time.

People are finding me doing searches for their needs. I fielded a lot of calls last year answering questions about what I do and don’t do, for example, ceramic repairs (It depends…”I can glue it back together if you have all of the pieces” is about the best I can offer.)

I only have two dinnerware orders pending right now and they both mainly involve plates. Plates are a tricky thing. If your kiln is vertical, as is mine, with 7 cu. ft. of space and 18″ shelves, then firing four dinner plates of 10″ – 11″ and four luncheon plates in one firing (on two shelves) is the maximum amount of flat ware that I can comfortably fit into the kiln and still get a good firing.

One time I tried firing three or four shelves of plates instead of my usual two shelves and the firing took about five hours longer than it normally does. That could also have been partly due to the fact that my heating coils in the kiln were starting to wear out and needed to be replaced soon after that. But unless you try several methods, you won’t know what is best. My work is constantly evolving because circumstances change, materials change, and the weather changes too.

The weather, something beyond my control, plays a large role in pottery making. This cold snap that has been happening for most of the winter plays a crucial role in whether or not I can even work in the pottery. My workshop is a converted garage with a cement floor and a baseboard heater along the outside wall. Other sources of heat: overhead lights and my electric kilns.

On days like today – it was – 35 C this morning – I simply can not work in the pottery. It’s far too cold and even though it is heated 24 hrs a day, it remains rather cold in the workshop, probably due to the lack of heating units and a cement floor. Currently we are thinking of ways to solve this problem. I have worn up to four layers of clothing into the pottery during the winter months. I always wear woolly or thermal socks and closed shoes, but on really cold days like today, my feet freeze.

Now, when you work with clay there is a 90% chance your hands will get wet. Clay is cold all of the time, but it is especially cold and quite unpleasant to work with in the winter. It is the kind of cold that shocks you right to your bones almost as soon as you start to wedge cold clay. That is the nature of wet earth though. It’s cold and it takes a while before it will warm up enough to work with comfortably, so if we have several nights of severe cold that can mean several days of no clay work.

When I’m not making pottery I have many other tasks that I must do to run a successful business. I’m pretty sure I’ve said this before, but it honestly can not be stressed enough. If you are self-employed, you are going to wear many different hats doing your job and it’s hard to change hats quickly. Give yourself time to transition between tasks. Sometimes I will break up my tasks with a walk outdoors or a session of yoga.

Lately I have been studying marketing and I have been getting business coaching and guidance from my sister, Toni. She owns a print production business. I’ve never studied marketing before, preferring to fly by the seat of my pants but my pants are wearing thin. I need guidance and information and to really learn something instead of intuiting it. Toni pointed me in the right direction where marketing is concerned. She sent me a link to PattyK’s Holistic Marketing website and I’m learning to market my business more effectively. I’ve only just begun and already I have a zillion ideas for launching a new website. I’m quite excited!

If you are self-employed and interested in working smarter instead of harder, I highly recommend learning some marketing skills. PattyK is a great place to start!

Posted in business, my work | Leave a comment

Almost Spring!

It’s hard to believe that it is almost spring. We are just 17 days from spring equinox and there is so much snow it could be July before it all melts.

Things have been going great the pottery for over a year now which is the reason I have little time to write blogs, but I regularly post photos of works in progress as well as finished work on my pottery Facebook page. https://www.facebook.com/PoterieLmSerafinPottery
It would be great to have a few more fans or “likes” and get the word out about LM Serafin Pottery!

When I last wrote I had just documented the making of my new sign that now is hung at the top of our road on Hwy 315. We’ve had so much snow this winter that it’s nearly buried there by the side of the road and each time the snow plow comes by, shooting it’s gigantic snow waves off the road, my poor sign gets turned sideways and the pot gets filled up with dirty snow. People have remarked that they’ve nearly missed the turn off because the sign is not very visible right now being practically buried or hanging sideways and behind a huge snow bank, but with some melting of the snow this week, maybe the sign will be more visible soon.

This winter has been hard on everyone across Canada and the U.S. health-wise, including me. As I write my ears are almost completely plugged up with an ear infection. I feel like I’m wearing ear muffs. I’ve been hearing so much about people getting sick with influenza that it has become daily news.

Before Christmas I had a few days of a gastrointestinal thing but it was over before I even realized what had happened, luckily for me. On New Year’s Eve I came down with influenza and it took me about 3 weeks to recover. I had a blissfully healthy three weeks following that before influenza part deux hit and now 12 days later, after two days of the worst body aches I have ever endured in recent memory, I am on Day 5 of antibiotics that were prescribed for “the worst ear infection ever seen in an adult” so said my nurse practioner. Hence the feeling of wearing ear muffs. But I shall survive! And pottery making will go on. I can feel it in my bones. I’m starting to miss the slippery mud between my fingers. I’m flipping through the latest issue of Ceramics Monthly totally craving getting back into the studio. I have orders to finish up too and would like to get those orders to my customers as soon as possible!

If you’ve been following my blogs then you know that pottery making is a long process. Along the way you learn that in order to have nice results in the glaze firings you must load your kiln so that there is little congestion and lots of air flow throughout. Staggering shelves if you have half shelves instead of full shelves is one way to do it, but also limiting the number of flat things you fire in each load is essential.

I have had quite a few orders for plates in the past two years and can only fire about 4-8 at a time depending on the size of plates – saucers, luncheon, dinner and charger plates, platters and square plates have all been ordered by several customers during this time. Glaze colour matters too. Some glazes fire better in the hot spots while some fire better in the cool spots in the kiln. Knowing thy kiln and how it fires best is a part of the puzzle that often takes the longest to figure out when you are new to firing a kiln. It’s a learning curve that often results in lost pots due to over firing and pots that need to be re-fired because where they were just wasn’t hot enough for the glaze to melt properly. But how else will you know unless you make those mistakes? Some mistakes can only be corrected by re-firing and other mistakes need a hammer.

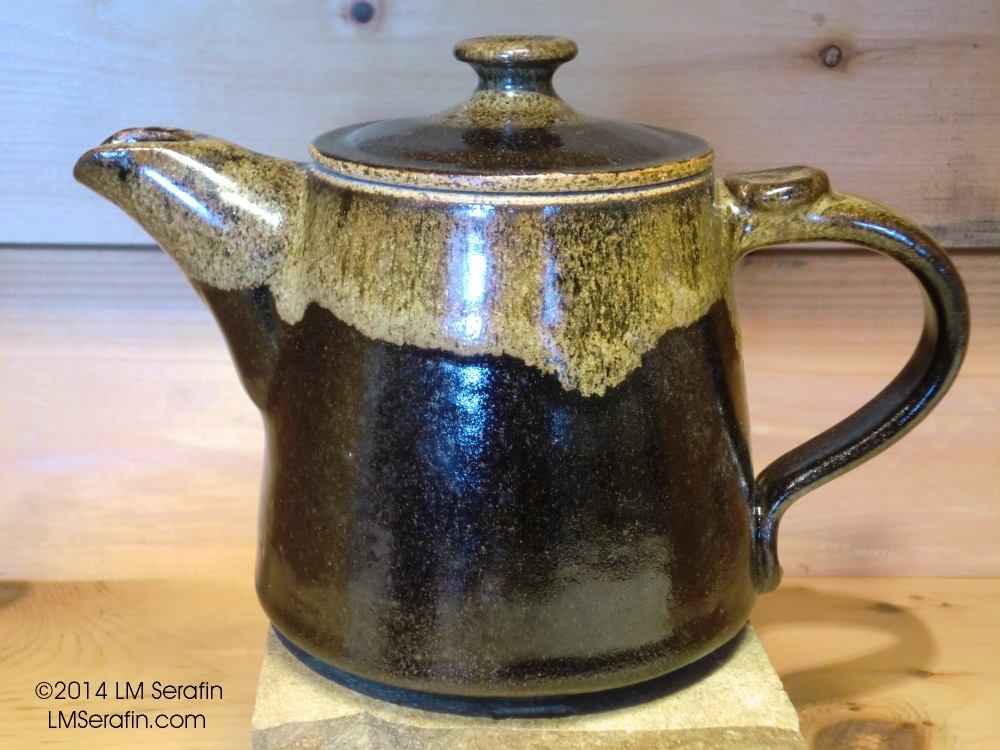
To compensate for all the plates that have been ordered, I’ve been making lots of tall mugs, beer steins, pitchers, teapots and goblets. I’ve also had to make a lot of soup bowls and while they are not especially tall, they are in demand and I always seem to need them. Mugs and bowls are the most popular items that are purchased in my little gallery. They make great gifts. They are the least expensive items that I make and can be very personal.

I’ve really had to step up production this past year to get my orders out in a timely fashion so imagine my disappointment catching yet another flu bug over a week ago. When you are sick, the last thing you want to do is wedge clay or have your hands in water all day long throwing pots on the wheel. This particular flu bug (part deux) really knocked me for a loop. I had to cancel so many plans! I had tickets!

I haven’t worked out for almost 2 weeks and I’ve barely left the house except to go get medicine for my ear infection and get the tailpipe fixed on the Jeep. I have read three novels, taken lots of naps (or just slept really late in the morning), watched a dozen movies or more, made three large pots of soup and thankfully I’ve managed to keep up with the housework although vacuuming is off the list right now because it hurts my ears.

I’m just itching to get out for a walk. I need to get back to my daily yoga practise. I guess I am on the mend if I’m talking this way. 🙂

Well, the chicken broth smells delicious and I can hardly wait for more homemade soup. Last week it was Smokey Tomato soup. This week I think I will make Potato, Kale and Leek soup. Hey, did I tell you that I’m writing a cookbook? It’s an idea that’s been rolling around in my head for a while now. I’m focusing on quick, healthy dishes served up in lovely pottery. I think the photos of the food in my pottery are going to be the best part of the cookbook! 😉

Posted in life, my work | 4 Comments

How I Made My Sign for My Business in 13 Not-So-Easy Steps

#1 Change your business name so you have to make a new sign.
It came to my attention that the name Poterie du Lac la Blanche/The La Blanche Lake Pottery, although catchy, was not going to cut it anymore. I had to start using my real name as my business name and the sign has to be bilingual because I live in Québec so “Poterie LM Serafin Pottery” it is and it’s perfect. Simple, to the point, and not much lettering to paint.  Bonus!
My background as a sign painter:
Self-taught.  Fairly good penmanship.  Have cheap paint brush and a “can-do” attitude.

#2 Find that piece of wood you had intended for another project.
There it is amongst a bunch of other pieces of wood propped up against the wall in the garage. A lovely piece of good quality plywood measuring 32″ x 32″.

#3 Paint it orange so it sticks out like a hunter in the woods during hunting season.
The reason my sign is orange is because I decided to paint the walls of my pottery shop orange and I had leftover paint, so naturally being the spendthrift that I am, the sign got painted orange too.  Well, actually I decided to paint the interior of my shop a lovely, low-key terracotta but something strange happened at the paint store that day. I lost my mind and chose a very bright orange that mimics a Hawaiian sunset. I haven’t been to Hawaii, but I have seen photos. And movies. Luckily the pots I make look great against an orange background! Whew!! And doubly lucky the sign really does stand out by the roadside in every season. Happy accidents are awesome. My life is built on them.

#4 Pick a font that is easy to read.
For the purposes of this sign, I decided to choose a font by simply going through the fonts available in Office Word 2003 and choosing something easy to read that sort of mimicked the maker’s mark I put on my pots, which is “LM.” I then printed out the sign to size (on several pieces of paper from the printer).
For other signs I have made I have used block lettering and free handed the lettering on the signs in pencil, but measured height and distance apart from each letter and each line of print. This is time consuming but making any sign is time consuming, so buck up and get ‘er done!

The signs pictured below:
The one on the left was painted on a white shelf I found at the trash house. I found two shelves and the 2nd one is attached with hinges at the top and serves as the back for this “sandwich board” style sign. The small sign on the right is also a sandwich board sign, but I had the wood laying around from another project, already painted white. Lucky me!
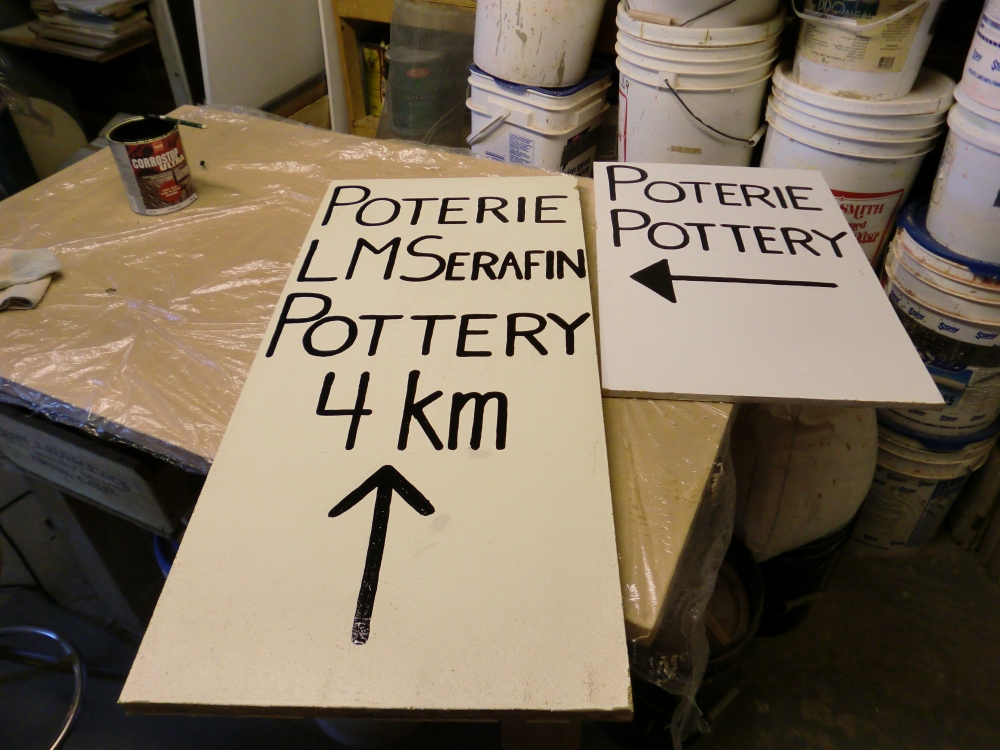
New signage painted just in time for my 6th Annual Summer Sale that was held in late June. The signs are out when the shop is opened…or when I actually remember to put them out!

#5 Decide where the lettering should go and if you would like anything else on the sign.
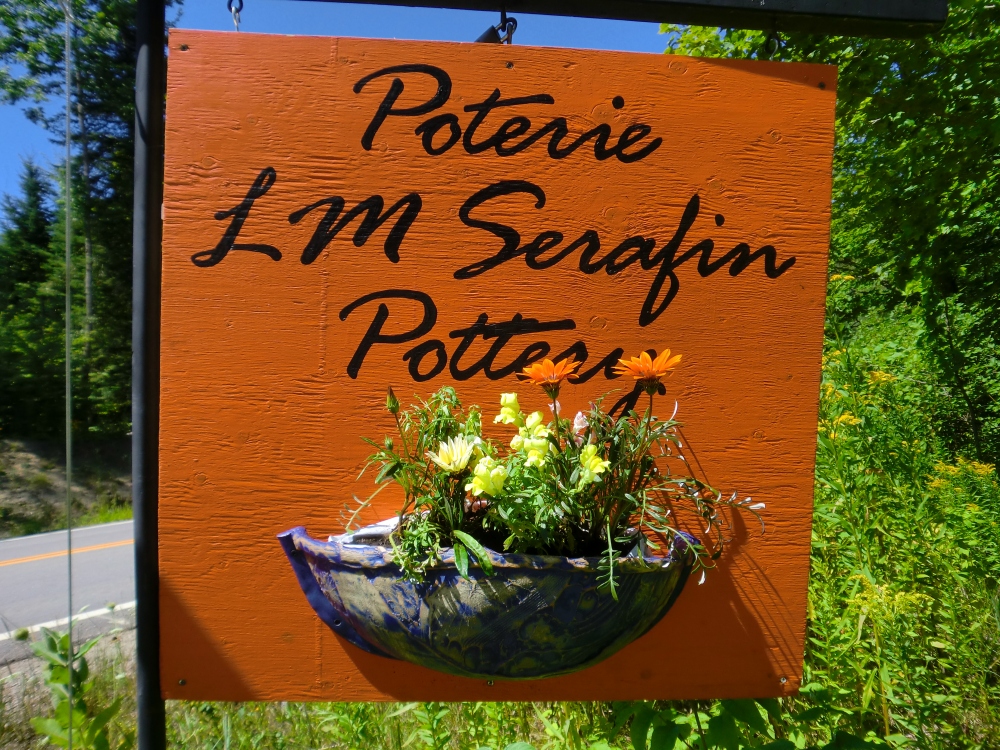
I chose to put my name at the top and leave room at the bottom for a half pot/planter to add some colour and beauty to my sign with the pot full of flowers. More on the pot-making aspect later.

#6 Carbon Paper is your best friend when using this sign making method that I dreamed up a few years ago. The idea is probably not original, but then again, maybe it is!
I used this method previously and it works well if you are patient and careful.  Without patience or care you end up with a crappy sign, so have both and you will be successful with your sign.
After printing out your business name/lettering to size (i.e. the size of the actual sign), tape the pieces of paper together and place them on the wood, taping the corners down. Slip the carbon paper under each section and trace your lettering onto the wood. Press hard to get a good transfer and you only need to trace the outside lines of the letters. Those will be your guidelines when painting in the lettering.
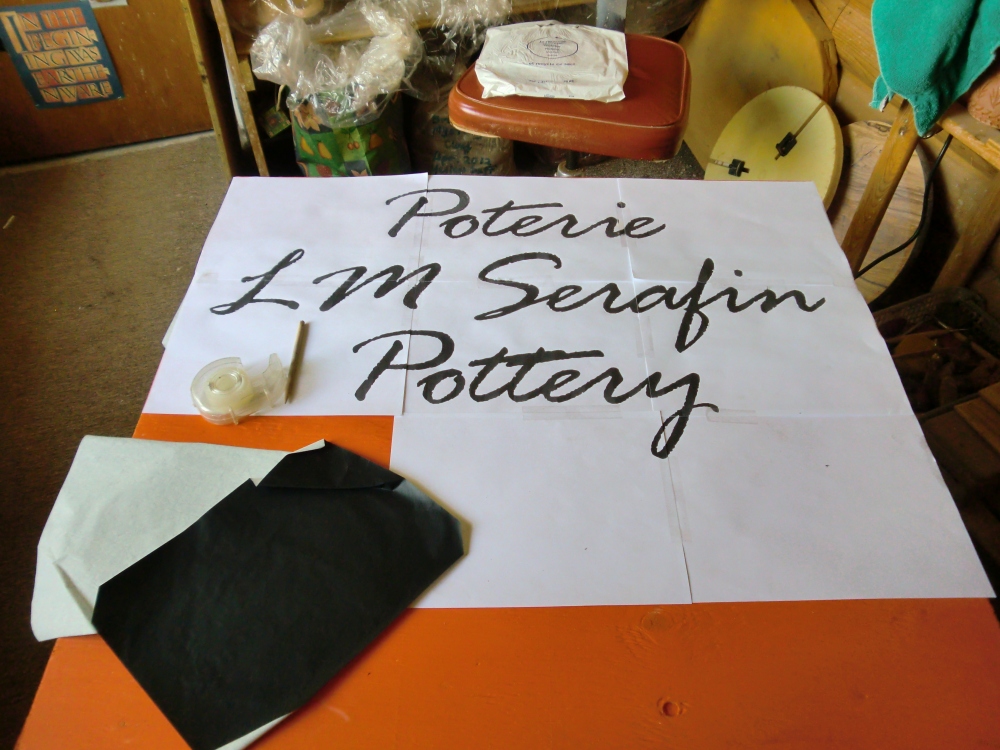
Pictured here:  the paper sections taped together and carbon paper (the black stuff).

Here’s a photo of the lettering after tracing. I’d already begun to paint the sign at this point.
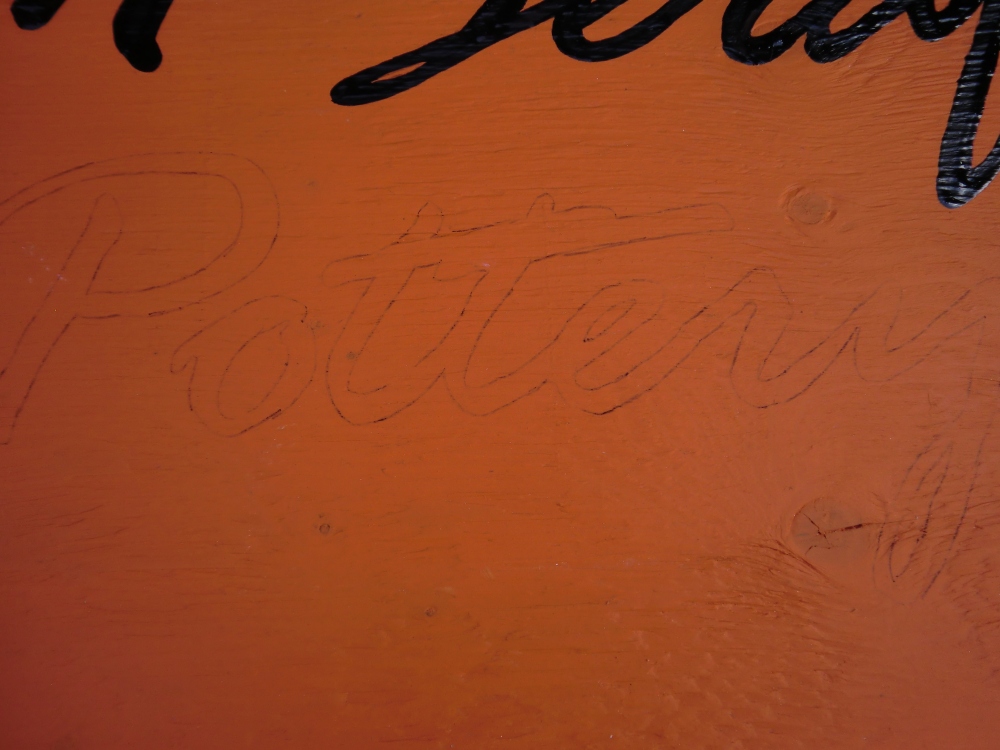
It’s faint in the photo, but you can see the lettering outlined here.

#7 Paint in the lettering
I used paint an oil based Tremclad paint for metal only and I think it’s just fine for sign painting. As they say, make due with what you have and this is what I had.
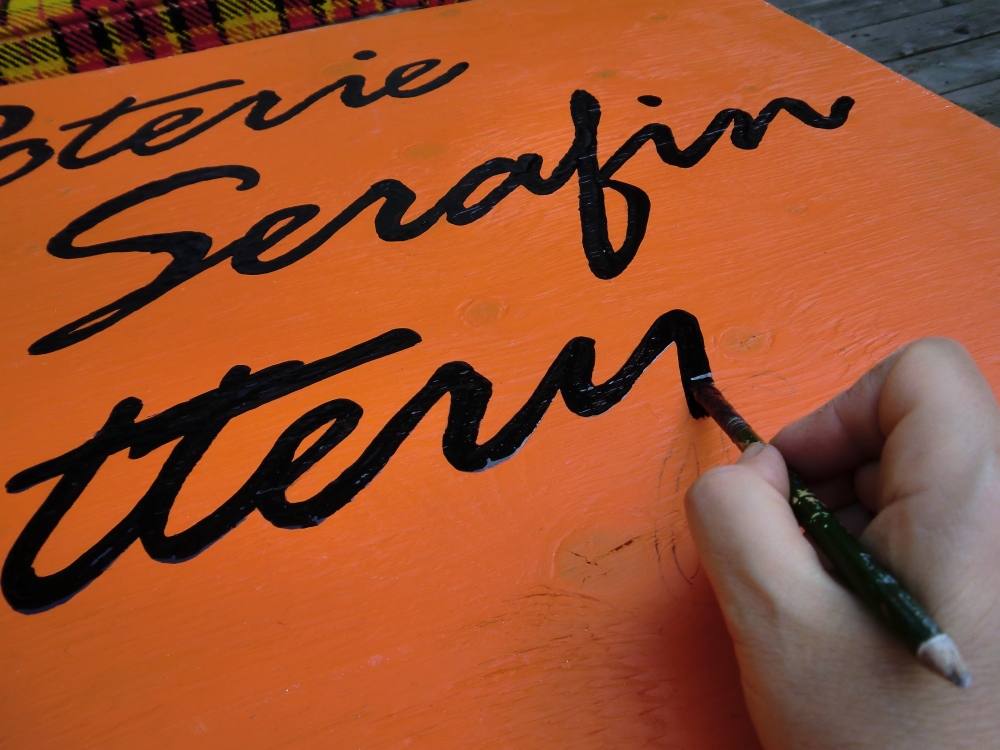
LM painting the new sign and staying inside the lines!

I took the sign outside to paint because paints, especially oil based paints, are incredibly smelly and permeate the entire house. Eyoo!! Paint outside!

Once the lettering has been transferred on to the wood via carbon paper, just stay inside the lines with the paint. It helps if you drag your hand on the board while painting. It gives you a lot of stability.

#8 Let the paint dry completely.
If you leave it outside to dry overnight you’re likely to find a few bugs stuck in the paint, so bring it inside and put the sign in the garage. Let the paint cure/dry completely.

#9 Add something pretty or unique to the sign!
It could be your logo or in my case, a planter. That meant making a humongous clay pot and cutting it in half then when finished I would mount it on the sign. I wanted the pot to be my signature style and for me that is the textured pottery that I make, like this:
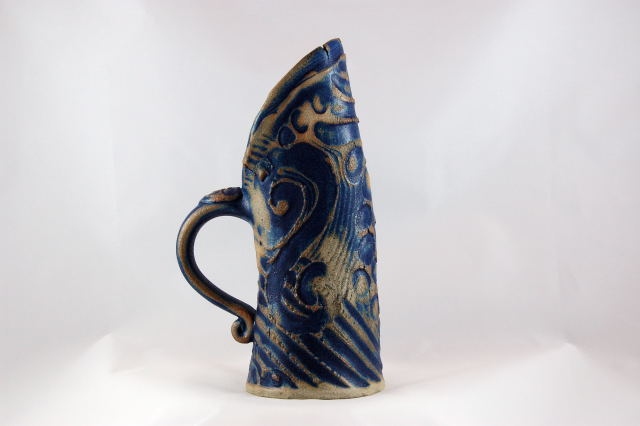
Textured jug. Photo by Jean-François Davignon.

#10 Construct the unique thing.
Because the textured pottery is made by hand (without the aid of a potter’s wheel) I first had to find some kind of mold in which to press the textured slabs to give shape and support. I have an old potter’s wheel that had a splash pan permanently fixed to it. When I got the wheel I was quite a bit larger than I am now and my belly was firmly pressed up against the splash pan as I tried to squeeze myself onto the seat of the wheel, but it was a no-go. The seat of this old wheel did not adjust. Because I couldn’t fit we made a decision to cut the splash pan off of the wheel so I could use the danged wheel. I tried using the wheel without a splash pan and it was completely ridiculous. I got soaked right through my clothes throwing the first pot and there was clay splattered everywhere! Suddenly I found myself in possession of two potter’s wheels that did not work. One with a fried circuit board thanks to an electrical storm and a hand-me-down wheel that I couldn’t use because I was too fat, then too wet. But I kept that old splash pan because I had a vision and it made the perfect mold for my new pottery planter!

#10 a. Make it work.
I patched the bottom then lined it with paper. Old telephone book pages makes for a great liner for molds in the studio.
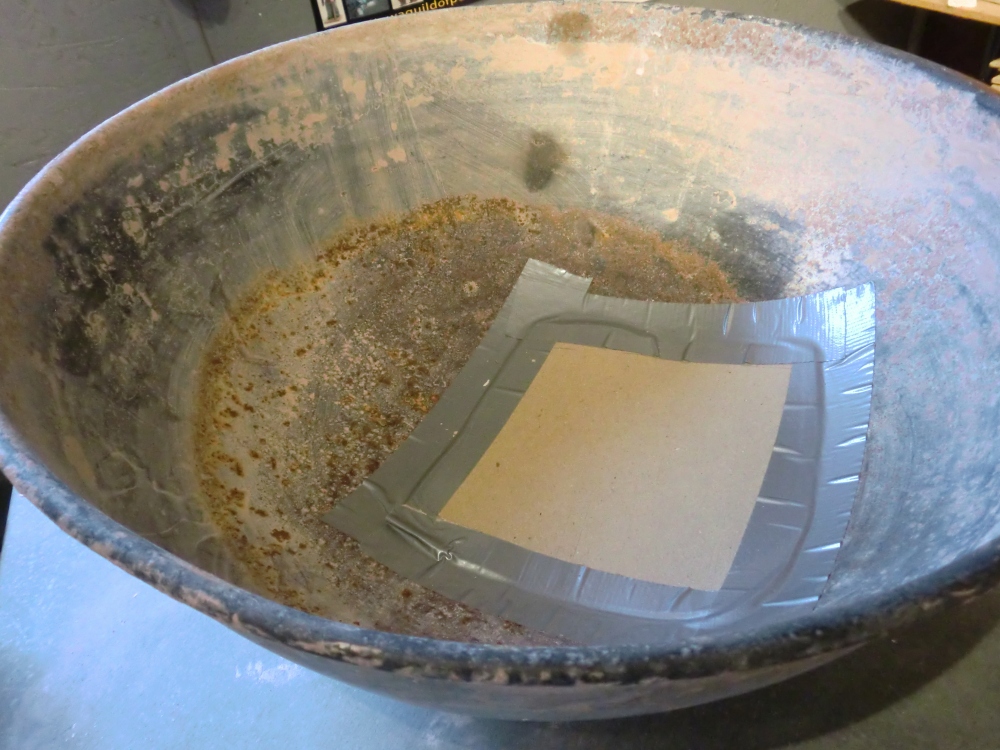
Cardboard and duct tape. Red Green would be proud!
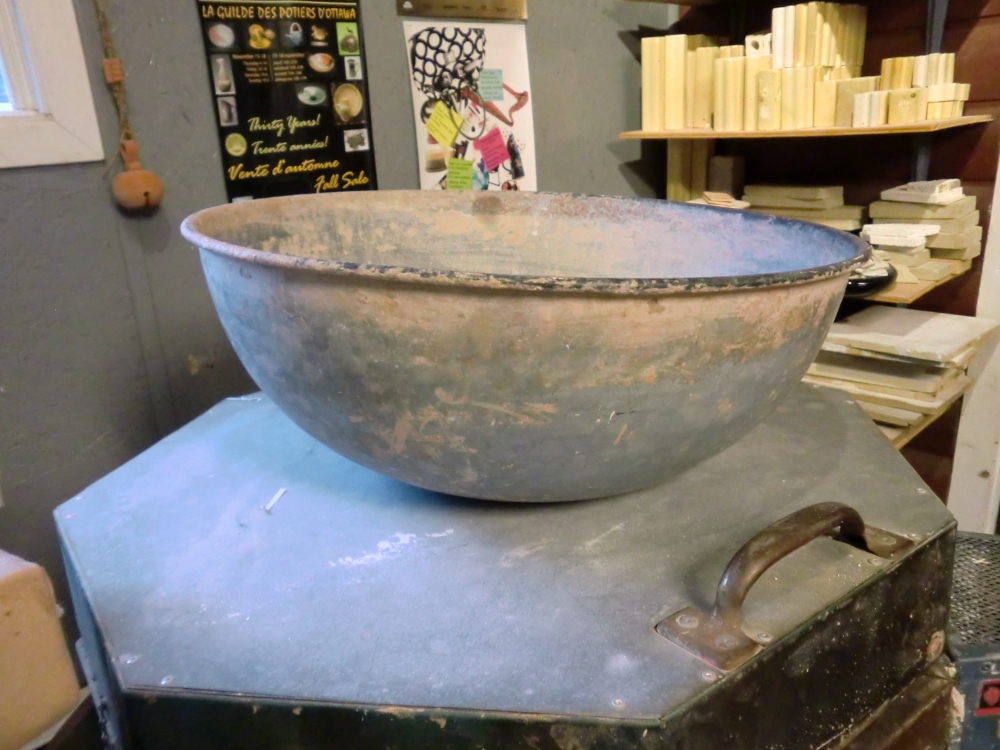
Side view of old splash pan.

#10 b. Create!
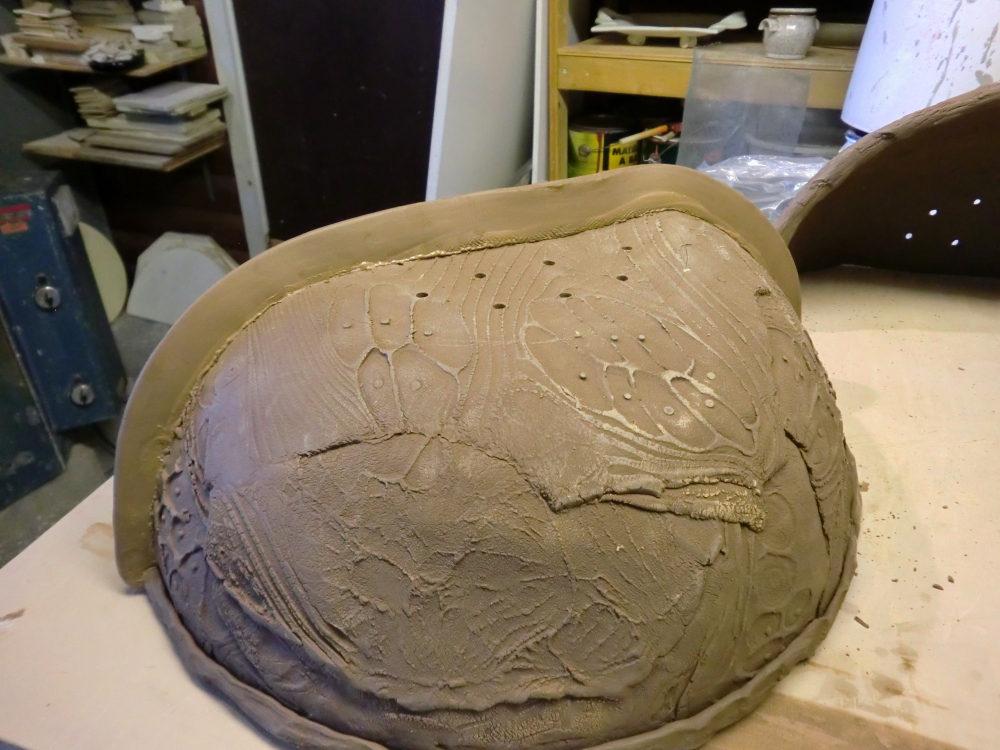
I made the textured slabs (now this part I can not show you or I would have to kill you), and then tore them apart and “patch worked” them into the mold. After the pot dried for a few days I removed the splash pan mold and this was the result.
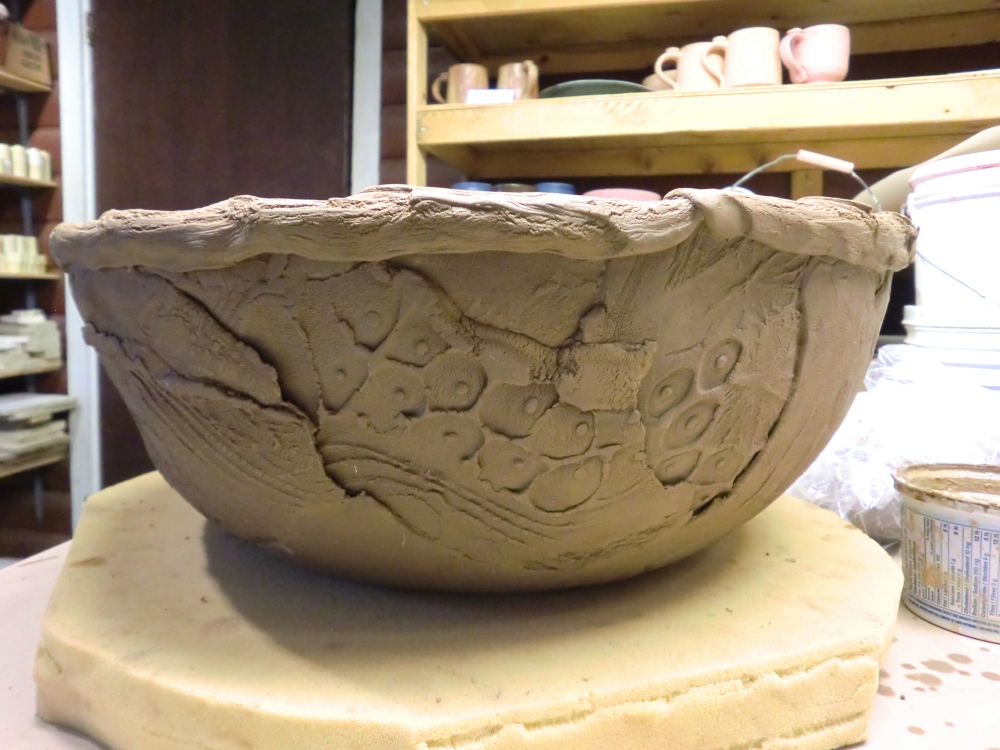
After I took the pot out of the mold I added the rim. Still wet but drying up.

#10 c. Work on your vision.
The pot dried for a few more days then it was time to make some drainage holes in it and cut it in half. Half went on the sign that is at the top of the road and the other half will go on the sign that will be hung outside my shop, hopefully before summer is over.
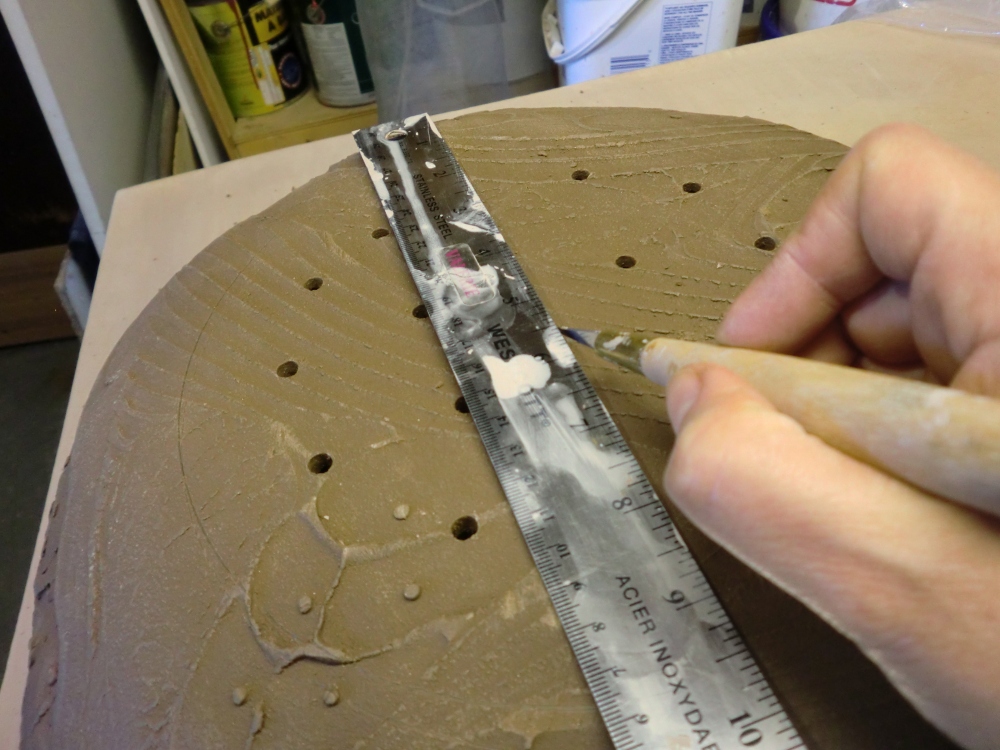
Measuring and marking after making drainage holes.
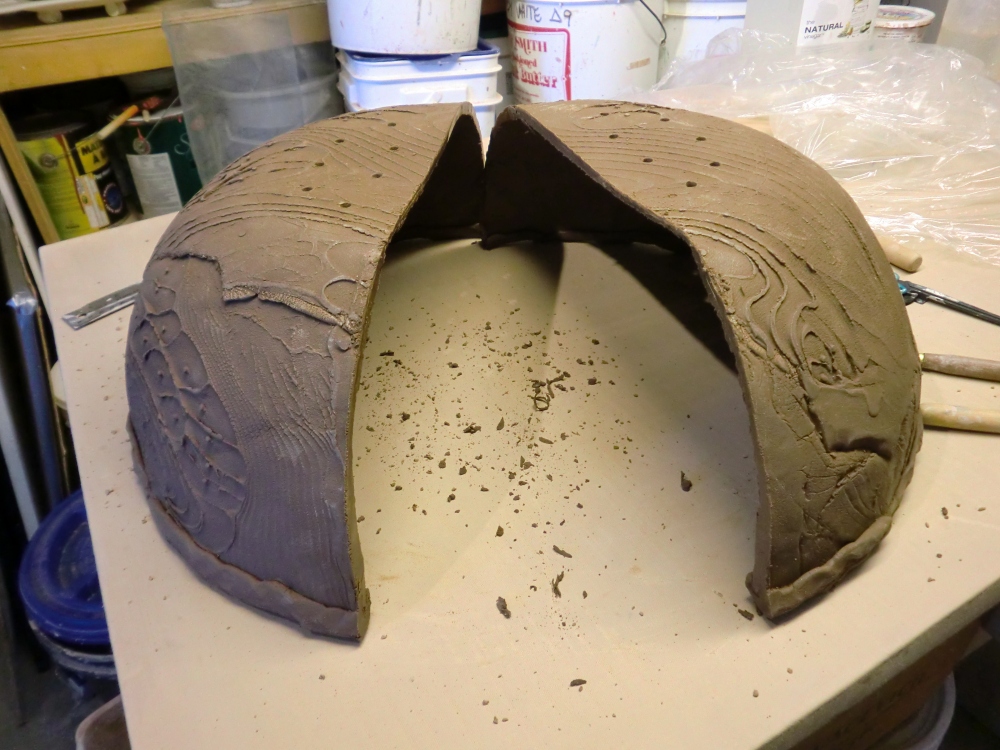
I did it! I cut it in half.

#10 d. Have faith in your ideas!
Now I needed to add a piece of clay like a flange onto the freshly cut pot so I could attach the pot to the sign later. I’d made a sign with pots on it before and I used tile cement to attach the clay pot to wood. It was messy, wasn’t easy to glue two unlike materials together and the cement yellowed with age and didn’t look nice.

I rolled out a nice fat coil then flattened it, scored the edges of the half pots and attached the flattened coil like this.
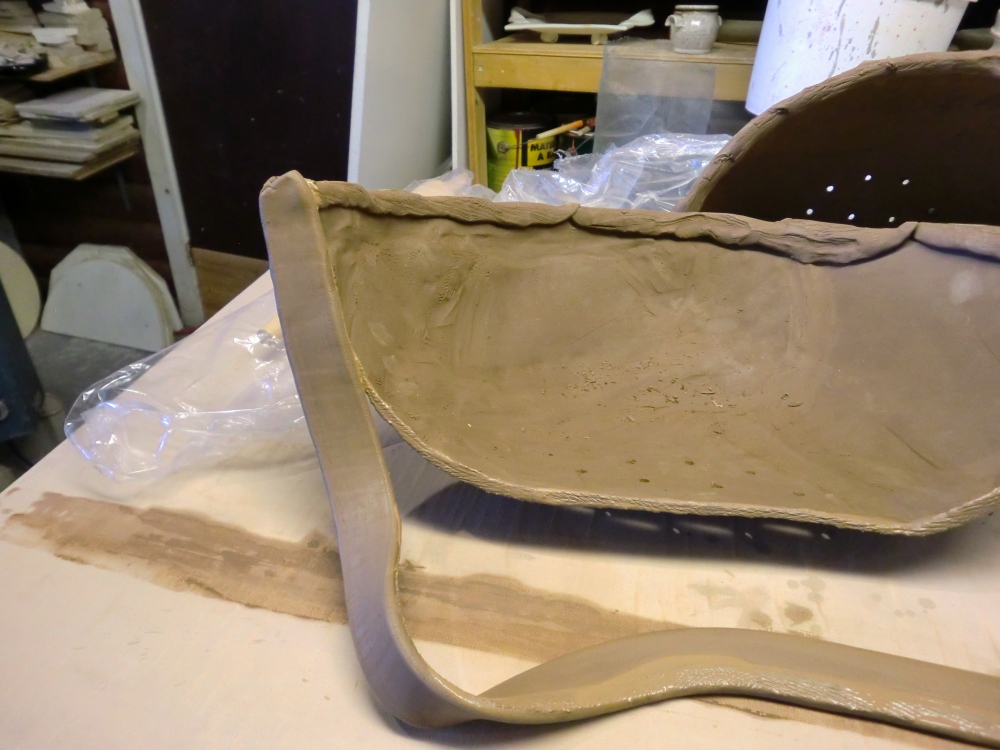
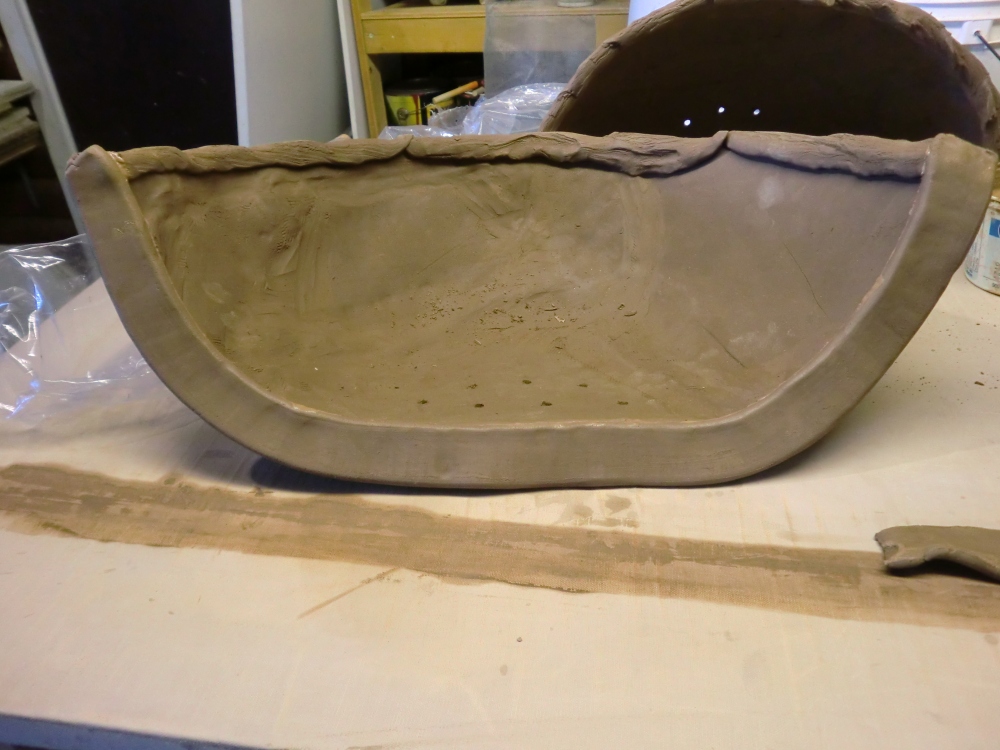
The view from the outside.

All cleaned up. View from the side.

#10 f. Work gingerly.
After drying for a day or so I made holes in the flange so I could attach the pot to the wood with a few screws.
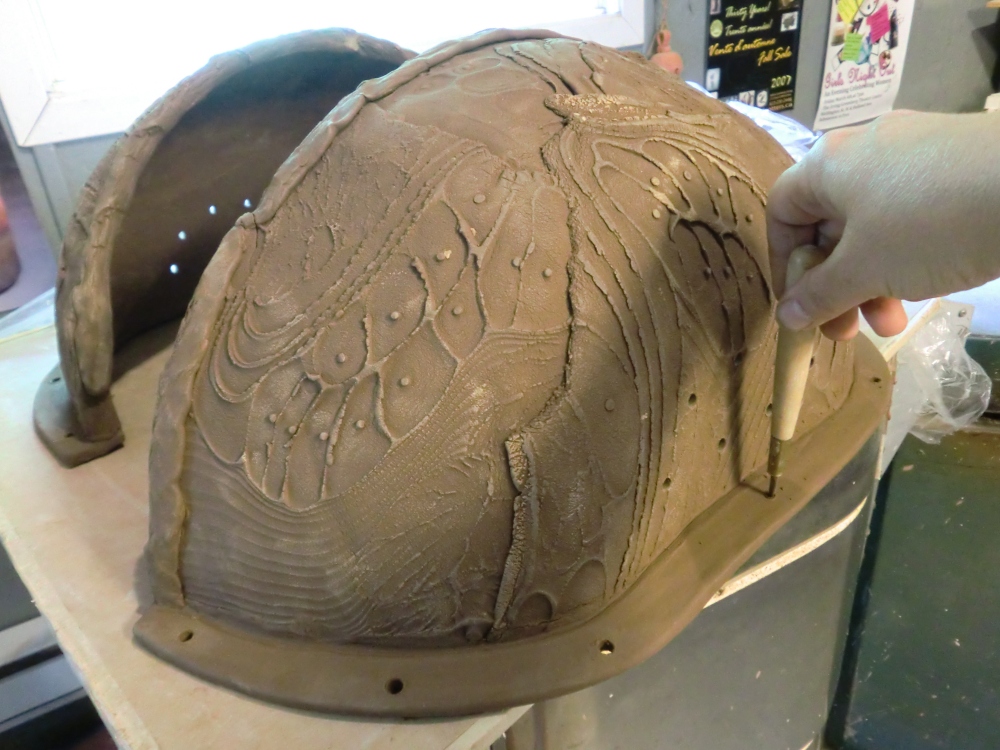
#11 Have patience.
With the pots completed, they were set aside under plastic to dry. After bisque firing they were glazed and fired again.

#12 Ask for help.
Once in a while I need some help. The wooden sign needed to be framed on the back and have hooks inserted in the top.  My partner is usually up for helping out when he can.

Framed and hooked.
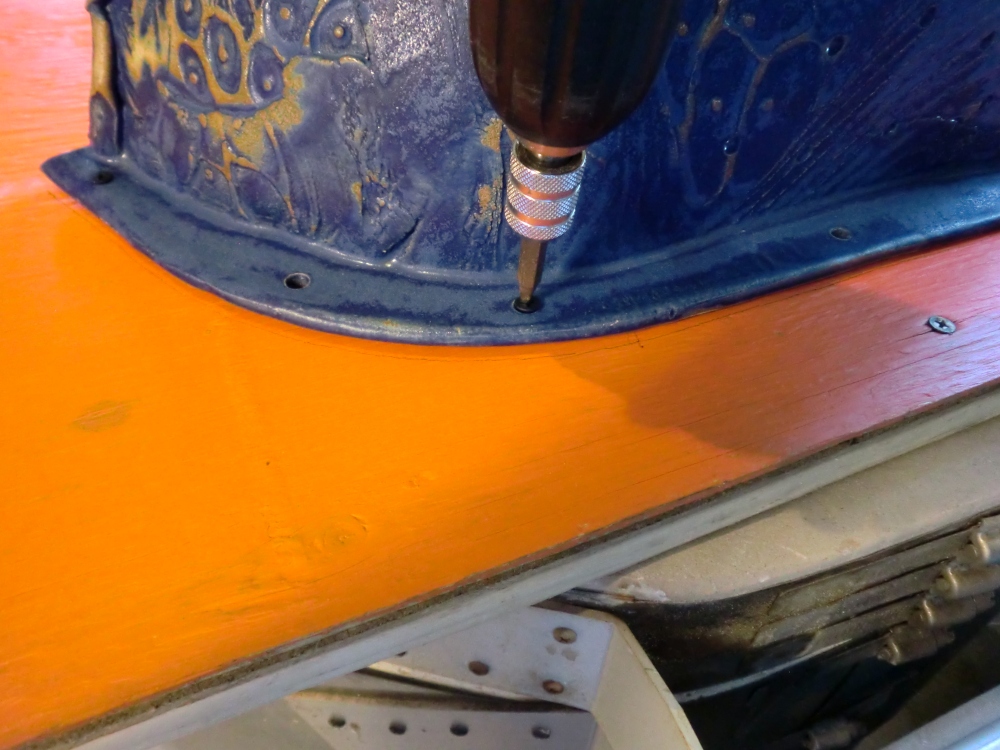
Screwed.
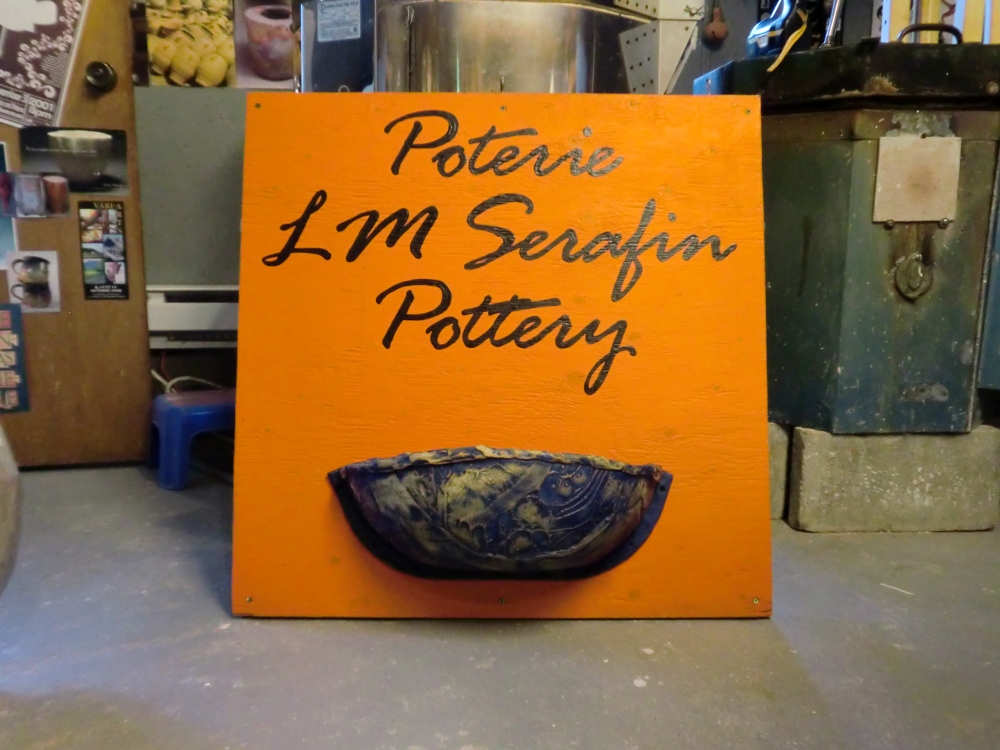
Almost done!

#13 Attention to detail.
It was always my intention to put flowers in the planter, but I was concerned that the wet earth against the wood would rot the wood, so while falling asleep one night I had an idea.  Line the planter with plastic!  So I re-purposed a soil bag.

And added flowers.
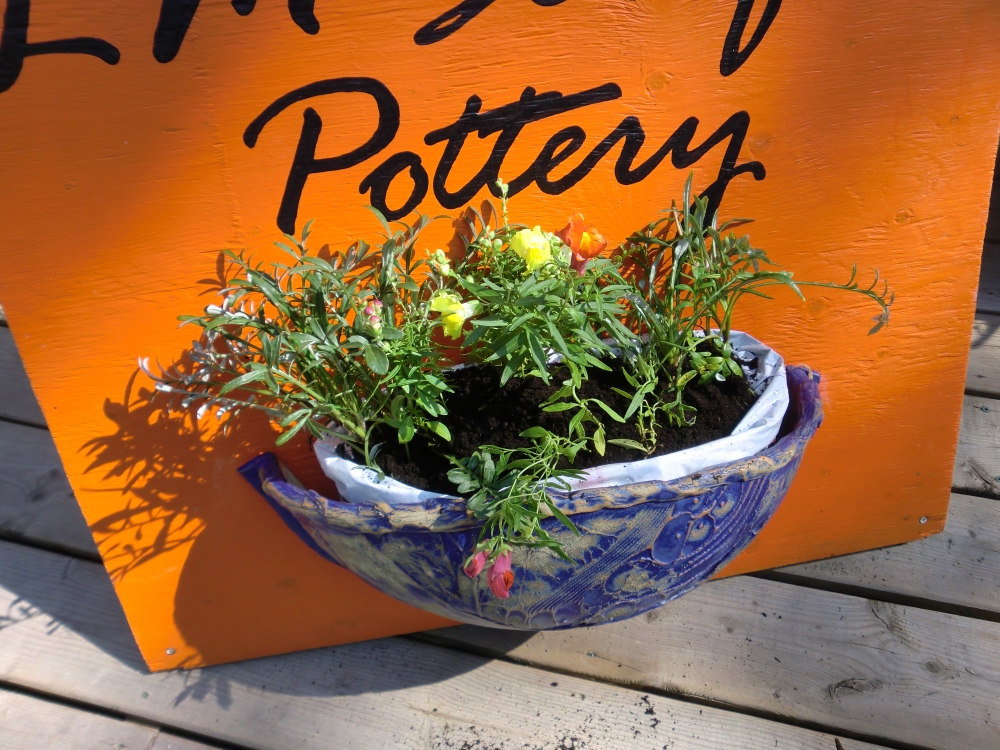
Then hung it at the top of the road on my sign post.
Now that I’ve got one sign completed it’s time to do the 2nd one!

I hope you enjoyed my How-to blog.  Remember, when you visit, just turn right at the big orange sign with the flower pot on it.  You CAN’T miss it!!
Posted in How-to | 2 Comments

Too Busy to Write? Oh yeah!

It has been a crazy, busy, productive spring and now it’s the first day of summer; the shortest night of the year. Through it all I have been highly productive and it will continue until Sunday, the last day of my 6th Annual Summer Sale.

Something new this year: Pottery tours on Saturday and Sunday at 2 p.m. What does that entail? Well, I will be making pieces on the potter’s wheel and be able to show you how a lump of clay gets from that wet lump on the wheel head to a finished piece! So on Friday I will be busy making pieces that I can cut in half to show proper wall thickness, pieces that I can trim to show you how a proper foot ring is made and the equipment I use to make it, and pieces onto which I can attach a handle. Fun! Fun! Fun! And educational!

I’ll also be signing up students for summer courses this coming weekend, so if you ever wanted to try pottery, even on a casual basis, you can, right here at my little studio in Mayo, QC.

The sale begins on Friday, June 22nd and runs until Sunday, June 24th. 10 – 6 each day. Tours at 2 p.m. on Sat. & Sun only.

By the way, this is the only sale at which I actually slash prices of old stock to move it out of the shop and get my 2nds out too. 2nds are pieces with slight imperfections.

The kiln is cooling now and there are many new pieces to be fondled and gazed upon and purchased.

I hope you will take some time this lovely summer weekend to come out and see my work. There’s never an obligation to make a purchase, but in case you want to, there really is something for everyone. Prices start at $5 and there are many affordable pieces here for your pottery collection.

If you are a potter you might want to consider taking advantage of the 2 p.m. tours. You never know what you might learn that you never thought of before or that you weren’t taught by your teacher(s).

Looking forward to seeing you at The Pottery!
For pictures of the latest you can now find Poterie LM Serafin Pottery on Facebook!
https://www.facebook.com/PoterieLmSerafinPottery

Posted in fun stuff, my work, shameless self-promotion | 2 Comments